
If I had found this earlier I may have saved myself some three hours of trouble shooting trying to find what I thought was a ground/shorting problem.
http://www.mindspring.com/~corvair/RadFAQ/horns.html
I don't endorse his FAQ I just include it here as a reference. I'd never play around with rebuilding a horn that broke, purely for safety reasons.
I also wanted something significantly LOUDER than the stock horns! So I went with the FIAMM horns. I finished this project in about 6 hours including the 3 hours of trouble shooting. I took my time, wired everything up and tested it. Disassembled it and soldered and re-tested before the final mounting. It was also my first time at taking off the gas tank, and replacing a fuse in the fuse box (don't ask). Your time will vary.
'Nuff said.
An alternative to using the old ground is running a completely separate
ground from the battery up alongside the new positive feed. I didn't have
enough different color wire and went with the method as stated above. I
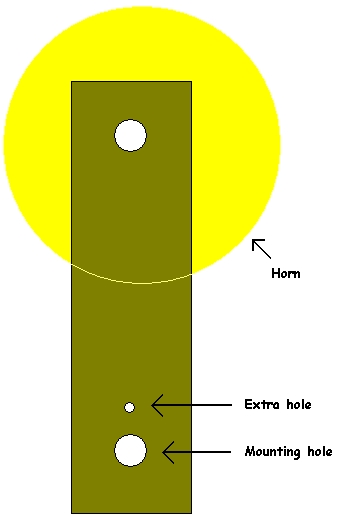
fit tested the new horns and had to drill a hole for the pin that prevents
the mounting bracket from rotating once mounted to the forks. [Note: Not
to scale. See pictures below. The extra hole is actually closer to the
horn than the mounting hole as depicted. Use the old horn as a guide when
drilling or punching the new hole's location.]
I wired the horns to the relay and tested it with a cable to the battery. Be Careful not to point the horns toward your ears or, better yet, wear hearing protection especially when trying this in a closed garage! I used crimp-on connectors onto the wires between the relay and the horn's flat spade connections. I then soldered and taped/shrink tubed the other ends to the relay. [Note: A few months later I noticed a plug in mounting block in the RS catalog for this DTDP relay. That might be easier to install although I'm not sure if it would fit with this configuration.]
I also installed an optional jumper to the horn mounting plate that acts as a ground. The (-) connection on the horn is connected to this optional plate with the included 3 inch connector wire. The other horn I connected to the original horn wire which is connected to ground. [Note: I tested the mounting crossbar on the fork to be certain it was a good ground and it was. I only did this as an extra precaution in case for some reason the forks became "ungrounded" somehow. The one horn connected to the original horn ground wire becomes the point of ground for the entire fork assembly which includes the other horn.]
Here comes the fun part. Wiring up the new 15 Amp feed from the battery. Since the new FIAMMs require a lot more current than the original stock honda horns, a new completely separate feed is recommended for this modification. I put a 15 Amp inline fuse right at the battery and ran 14 gauge wire along the wiring harness up under the tank. YES THIS DOES REQUIRE REMOVING THE FUEL TANK! I lifted the tank away from the frame and fed the wire up through with the other hand while hugging the tank to keep it from falling. I wouldn't recommend this method to anyone. It was my first try at removing the tank and I had no help and a recently filled tank which I could not empty safely so I chose this method. Please use caution when working around fuel. [Note: keep soldering irons, heat guns for shrink tubing and matches FAR AWAY while performing this step!]
Mounting the relay was also fun. In a nutshell, I used two cable ties and some 3500 lb strength epoxy and mounted it to the cross beam just behind and between the horns (See picture below).
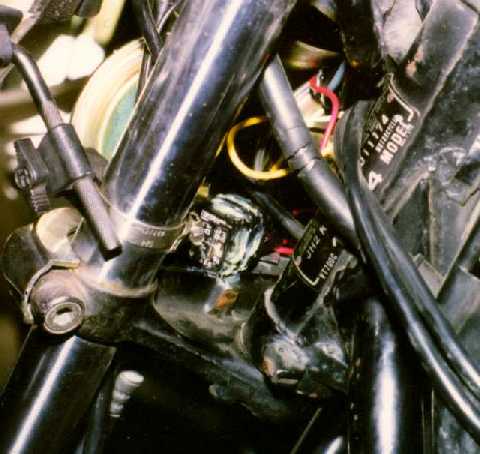
This view is from the left side with the wheel turned all the way right. That cream glob is the relay. It is oriented with the wires pointing forward between the two horns and you can just make out the schematic which is normally on top now on the side. Be careful not to mount the relay to far back as it will impede the wheel from turning all the way to the left. That rusty stain is the left turn limiter thingy. The relay should be mounted forward of that. The cable ties went through a hole in the cross bar and were basically spread apart evenly on the relay. Epoxy was applied prior to strapping down the cable ties. It isn't going anywhere; trust me. In the picture below you can see the two cable ties just to the left of the horn on the right (as you are looking at the picture). The extra hole I drilled is hidden by the shadow if the horn.
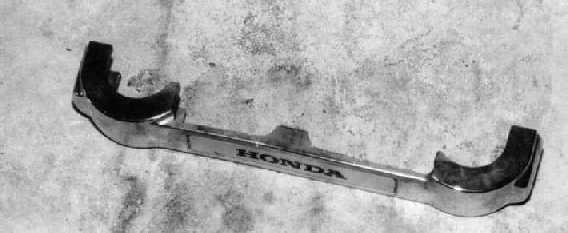
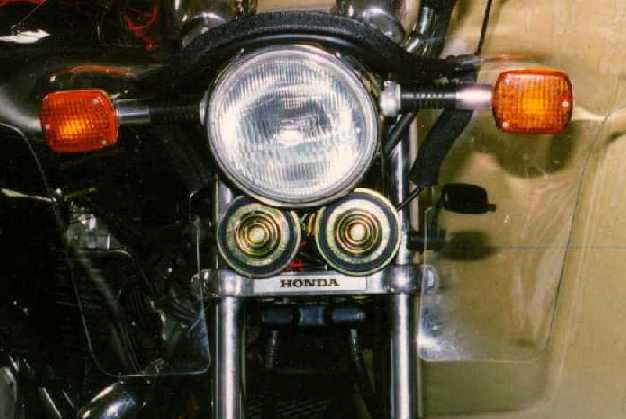
This is when I discovered I had to slightly modify the plastic honda piece. I had to cut a small piece out of the center to allow for the relay. See the small cutout just above the "D" in HONDA?
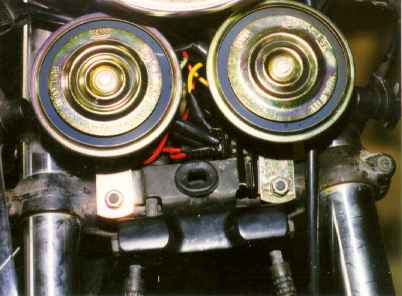
When I got everything back together this is what it looked like:
George Laing
glelaing@erols.com